

Table of Contents
- Tools and Materials for Commercial Plumbing Repair
- Commercial vs Residential Shower Valves: What Changes
- Step-by-Step: How to Replace a Commercial Shower Valve
- Commercial Shower Valve Cartridge Replacement and Troubleshooting
- Average Time to Replace a Shower Valve and Code Compliance
- Wall Repair and Access Panel After Valve Replacement
- Conclusion
- Frequently Asked Questions
Last Updated: September 29, 2026
Tools and Materials for Commercial Plumbing Repair
Replacing a commercial shower valve starts with having the right tools on hand before you touch a single fitting. A missing hex key or spare O-ring means a second trip and a unit that sits out of service longer than it should.

Here's what a standard commercial plumbing repair kit needs:
- Adjustable wrench and a spanner wrench for the retaining nut
- Flat-head and Phillips screwdrivers for the handle and trim plate
- Hex key set for set screws on most faucet handles
- Replacement cartridge, O-rings, and gaskets matched to the valve body
- Plumbing grease, Teflon tape, and pipe dope for the threads
- Bucket, towels, and a small flashlight for leak detection
This guide from Ready Bathroom Solutions walks through each stage, from shut-off to final trim. Pre-kitted repair sets remove the guesswork: one box holds every part for the job, so a technician never leaves the property mid-repair.
Commercial vs Residential Shower Valves: What Changes
Most guides for this job are written around a single-family bathroom, where the valve body is buried behind drywall and the cartridge pulls out by hand. A commercial shower valve is a different animal, and treating it like a residential unit is how a one-hour repair turns into a two-day unit turn.
Four differences change the procedure:
- Valve architecture. Residential valves are usually pressure-balancing or simple mixing cartridges. Commercial fixtures in hotels, dormitories, gyms, and assisted-living facilities are frequently thermostatic mixing valves (TMVs) or pressure-balancing valves with integral stops. A TMV has a separate thermostatic element and often a maximum-temperature limit stop that must be set with a thermometer at the outlet, not just dropped in and capped.
- Connection type. Residential replacements commonly land on 1/2 in. IPS or sweat copper. Commercial valve bodies are typically ordered in 1/2 in. CC (copper-to-copper), CPVC, or cold-expansion PEX, and the rough-in dimensions differ between them. Order the wrong connection and the valve will not seat against the existing stub-outs without an adapter.
- Access. Commercial valve bodies are usually set behind a removable access panel in an adjacent closet, corridor, or chase. That is a code-driven design choice, not a convenience, it lets maintenance swap a cartridge without demolishing finished tile.
- Duty cycle and water chemistry. A hotel valve cycles dozens of times per day and often runs on harder water than a single-family unit. Mineral scale and stem corrosion set in faster, which is why seized cartridges are common in commercial work and rare in residential.
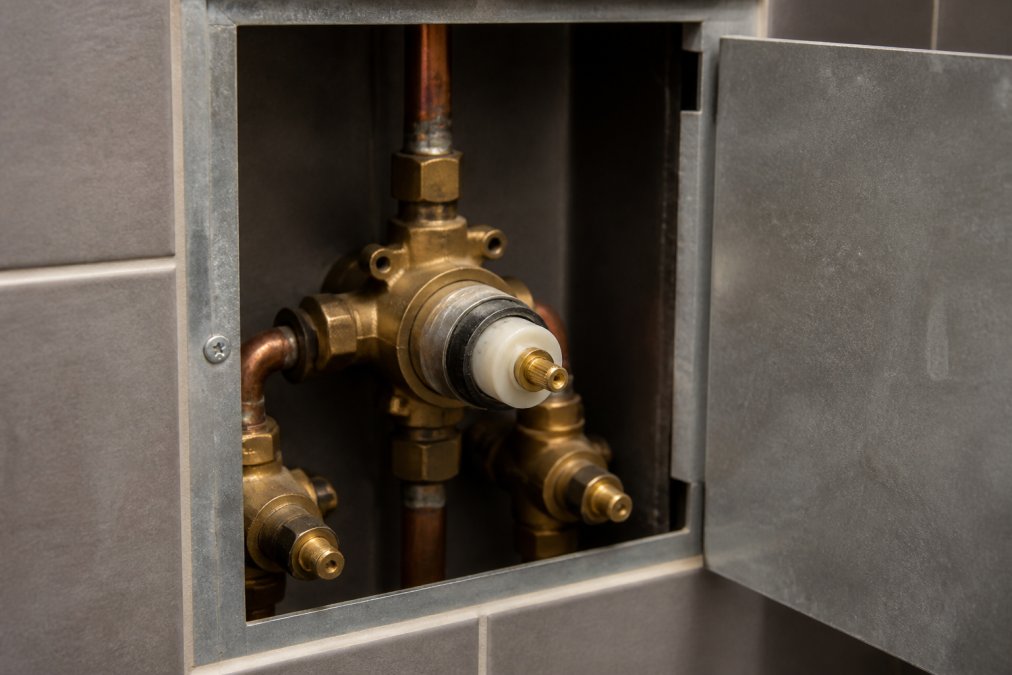
Step-by-Step: How to Replace a Commercial Shower Valve
The full job runs about one to two hours for a technician who has done it before. Work through the steps in order, and test before you close up the wall.

Step 1: Shut Off Water and Relieve Pressure
Close the main water shut-off or the unit's isolation valve first. Open the faucet handle to drain remaining water and relieve pressure in the lines. Skip this and you'll get a face full of water when the cartridge comes loose.
Step 2: Remove the Handle, Trim Plate, and Access the Valve Body
Pop the index cap, loosen the set screw with a hex key, and pull the faucet handle free. Remove the screws holding the escutcheon, or trim plate, then set it aside. On commercial installs, the valve body usually sits behind an access panel, so you avoid cutting drywall.
Step 3: Remove the Old Cartridge, Clean the Housing, and Install the New Valve
Pull the retaining clip or unscrew the retaining nut, then work the old cartridge out with the spanner wrench. Scrub the valve housing to clear mineral buildup and corrosion. Wipe the new cartridge's O-rings with plumbing grease, seat it, and reattach the retaining nut. Reinstall the trim and handle, then restore water and check for leaks.
Shower Valve - MOEN INC - 1/2 in. CC →
Commercial Shower Valve Cartridge Replacement and Troubleshooting
Cartridge replacement fixes most commercial shower valve problems, but not all of them. Match the symptom to the cause before you order parts, and know which failures you can fix in place versus which require a valve body swap.
| Symptom | Likely Cause | Fix |
|---|---|---|
| Dripping when off | Worn cartridge cup seal or O-ring | Replace cartridge and O-rings |
| Temperature swings when a neighboring fixture runs | Failed pressure-balancing spool, or wrong cartridge type installed | Replace with the correct balancing cartridge or valve body |
| Handle turns but no water | Broken stem or stripped broach in the handle | Replace stem and handle |
| Low flow on hot or cold only | Clogged inlet screen or integral stop partially closed | Pull and clean the stop, flush the line |
| Water leaks from behind the trim | Failed body seal or loose retaining nut | Re-torque retaining nut; replace body if cracked |
| Handle will not turn at all | Seized cartridge from scale or corrosion | See seized-cartridge procedure below |
Removing a Seized or Corroded Cartridge
A stuck valve is the one most technicians get wrong. Forcing the handle cracks the stem or snaps the cartridge broach, and now you are replacing the valve body instead of the cartridge. Work through these steps in order:
- Soak before you pull. Apply a penetrating oil or a descaling solution (white vinegar or a commercial lime-scale remover) around the cartridge-to-body seam and let it sit. On heavy scale, repeat over 15 to 30 minutes.
- Use the right puller. A cartridge puller threaded onto the stem applies even axial force. A spanner wrench on the retaining nut is for the nut, not the cartridge, using it to twist the cartridge out is how broaches strip.
- Apply heat sparingly. A heat gun on the valve body (never a torch near the trim or PEX) can break the bond from mineral cement. Keep the flame or element moving and stop before the body discolors.
- Rock, do not twist. Once the puller has tension, rock the cartridge side to side in small increments. Steady axial pull beats rotational force every time.
- If it will not move, stop. A cartridge fused to the body usually means the body itself is pitted or out of round. At that point, replacing the valve body is the correct call, and the access panel you already have makes that a two-hour job instead of a wall demolition.
Post-Installation Checks Before You Close Up
- Run hot and cold for at least two minutes and confirm the outlet temperature holds steady when another fixture in the building is opened.
- Check the integral stops and the retaining nut for weeping.
- Confirm the handle rotates through its full range without binding.
- Verify the maximum-temperature limit stop on a TMV with a thermometer at the outlet.
Average Time to Replace a Shower Valve and Code Compliance
A single commercial shower valve replacement takes most technicians 60 to 120 minutes, including cleanup. Two people cut that time when the valve sits behind a finished wall.
Wall Repair and Access Panel After Valve Replacement
Wall repair after access depends on how you got to the valve body. If your building already has an access panel, the job ends when the trim goes back on.
When there's no panel, you have two options:
- Cut and patch. Open the wall, replace the valve, then patch drywall and repaint. Slower, but works in tight spaces.
- Install an access panel. Add a removable panel now so the next replacement takes minutes, not hours.
Conclusion
Commercial valve replacement rewards preparation more than speed. The wrong cartridge, a missing O-ring, or no access panel turns a one-hour job into a three-day unit turn.
Frequently Asked Questions
How long does it take to replace a commercial shower valve?
Most single valve replacements take 1 to 2 hours from shut-off to water test, including trim removal and cartridge swap. If the wall must be opened for access, add 30 to 60 minutes for cutting and patching. Commercial properties that stock pre-kitted parts and use the same valve model across units often finish closer to 60 minutes per unit, which helps reduce room downtime during peak turnover.
Can I replace a commercial shower valve without opening the wall?
In many commercial bathrooms, yes. Valves with front-access trim plates and retaining nuts let you pull the cartridge through the wall opening without cutting drywall. If the valve body itself is corroded or the connections are behind tile, you will need an access panel or a small cutout. Check for an existing access panel on the opposite side of the wall before you start cutting.
What is the right replacement cartridge for a commercial shower valve?
Match the cartridge to the valve body model, not just the brand. Moen, Delta, and similar commercial valves use specific cartridges tied to the valve series. Write down the model number stamped on the valve body, then order the matching cartridge. Using a universal cartridge in a commercial pressure-balancing valve can cause temperature swings and premature failure.
Do I need a license to replace a commercial shower valve?
Requirements vary by state and local jurisdiction. Many areas allow in-house maintenance staff to replace like-for-like cartridges and valves without a license, but new valve installations or changes to the plumbing system often require a licensed plumber and a permit. Check with your local building department before starting work, especially in hotels and multifamily buildings subject to commercial plumbing codes.